
Felting machine manual
Operating instructions and safety notes.
Always disconnect your machine from the power supply to carry out adjustments, maintenance, cleaning, to add or remove water, or at any time other than normal use.
Lifting and moving your machine.
- The top roller must be empty
- Lift the machine only by the handles provided at either end
- The machine must sit on it’s feet only, not the tray
- Do not slide or drag the machine on it’s feet
| Timer | Mode “D” Do Not alter | Range adjustable at bottom left side of dial |
| Top left | Speed control dial | Normal range 10% to 90 % |
| Top right | Main ON / OFF | Red light when on |
| Middle | Timer | Adjustable “Range”, (set at bottom left side of timer dial) |
| Bottom Left | Start | Starts machine and timer |
| Bottom Right | Stop | Stops machine and zeros timer |
| Silver with Red top | Guard switch | Opening Guard, stops machine & Holds timer, Close to start |
Guarding. Your machine has been fitted with guards to protect the operator against accidental entrapment in the motorised moving parts.
- To lower the guard depress the latch located next to the speed control.
- It is the operator’s responsibility to ensure that the area around the machine is kept clear of people or objects that could become jammed by the moving guard.
- Closing the guard lowers the top roller, the weight of the top roller can be altered, this will change the effort required to open and close the guard.
- You can release the guard latch and then use both hands to lower the guard.
- When opening the machine ensure that the guard latches at the fully open position
Levelling. The machine must be level. Leveling can be effected by adjusting the feet.Wind the feet down progressively a total of 8/10 turns, then together with a 1.2mt / 4 Ft spirit level.Open the guard and place the level over the front legs and adjust them, then under the frame behind the rear legs.After leveling tighten lock nuts.
Tracking is factory preset, user adjustment is not usually required.
Flexible Core.The flexible core is a two-part assembly do not use the mesh without the white tubular centre-supporting core.
- Remove the mesh core from the machine when stopped.
- Do not store the mesh core in the closed machine.
- Rolling up carrying medium (eg bubble wrap, grip mat, flywire etc) It is important that the bundle is rolled up straight and parallel.
- Standing at the end of the table, holding the flexible core (FC) with its flap at the top and pointing away from you, place the FC on top of the Bubble wrap (BW) bring the BW up and over the FC and past the flap by about 10cm/4”.
- As you begin to roll up the bundle you are aiming to anchor the carrying medium / BW to the core, the cores flap provides grip for the carrying medium preventing it slipping around the core.
- When loaded in the machine the bundles flap must hang down in front of you.

Start rolling Slowly %30 – %40
Start Rolling slowly: Approximately 30% –%40 speed, this will allow the bundle to “wrap up” tighter and become secure on the core, open the machine and feel the bundle it will become more solid after several revolutions, experience will guide you as to when to turn up the speed and how fast to go. Flat out is not always best.

Multi Range Timer
Multi Range Timer: The timer has several “ranges” Eg. Seconds, Minutes, Hours, it is delivered set to Hours with the scale from 0 to 1 Hour. On this scale 0.25 = 15 min, 0.5 = 30 min, 0.75 = 45 min. The range can be adjusted with the Philips head screw marked, AT11DN situated at the bottom left of the timer. Always leave the Mode set on, “D”….
Pressure. Once familiar with operation, additional pressure can be applied to the process in the form of water. The water is contained within the top roller, empty weight 9kg.
Note the addition of water is not normally required for general felting.
To add water, maximum of 6 Lt:
- Turn off and disconnect from power
- Lift guard to open position.
- Raise top guard after loosening the bolts at it’s rear pivot
- Attach Guard support to hold the guard the up.
- Turn rollers by hand till a plug is at the top, remove plug and fit funnel and hose.
- Rotate roller and funnel till the other plug is at the top.
- Remove the top plug so the air can flow in or out as you add or remove water.
- Replace top plug and rotate roller till the hose / funnel is at the top.
- Remove hose / funnel and replace plug.
- Note there is no need to over tighten the plugs as the holes are tapered to ensure a seal.
- You must ensure that the plugs are installed flush with the rollers end.
- Rotate roller a full turn by hand.
- Remove top guard support.
- Lower top guard and tighten pivot bolts before reconnecting power and turning machine on.
General Maintenance.
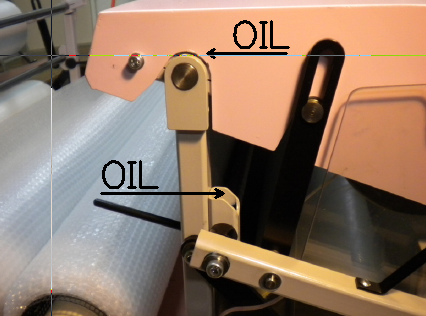
Pivots Oil Monthly at both ends
PIVOTS: There are four pivots that will need oil occasionally. Each end of both the upper and lower pivots will need a drop or two of light oil once a month. All other bearings are self-lubricating and need no additional oil.
CHAINS: All three chains should be lubricated, an occasional light spray with ( Inox spray OR motorbike chain Lube) on the chains and sprocket teeth will greatly assist in longevity and appearance.
CLEANING: It is important for proper operation and longevity, that the machine be kept clean at all times. The Tray can be cleaned using a soft cloth and a thin timber batten to push the cloth through the Tray beneath the rollers.
Disconnect the power, and do not run the machine while cleaning or lubricating chains. Turn the rollers by hand.